Buy Yamaha Outboard Parts

Announcement

Collapse
No announcement yet.

WOT Overheat 94 ProV 115hp

Collapse
X
 
  • Filter
  • Time
  • Show
Clear All
new posts

  • WOT Overheat 94 ProV 115hp

    The alarm went off on my 1994 Yamaha ProV 115 when I pushed it to WOT. I brought it down to idle speed and the alarm turned off in less than 1 minute. The water pressure was reading a bit lower than normal, and the water temperature was like only 5-10 degrees higher than normal. Like 150 degrees. The engine can run all day at 3400-3800 rpm my normal operating range, but when WOT the alarm goes off.

    I checked the impeller and it was formed round, so I installed a new impeller, O-rings, and gasket. I tested it on the water and the water pressure was better than ever, and the water temperature was under 145. BUT when I pushed it to WOT, the alarm went off again after like 1 minute.

    I have a water temperature gauge as well as a water pressure gauge(both aftermarket), both senders are mounted on top of the heads with the Yamaha MAR-WPRES-TR adapters, the sender for water pressure is on the port side and the sender for temperature is on the starboard side.

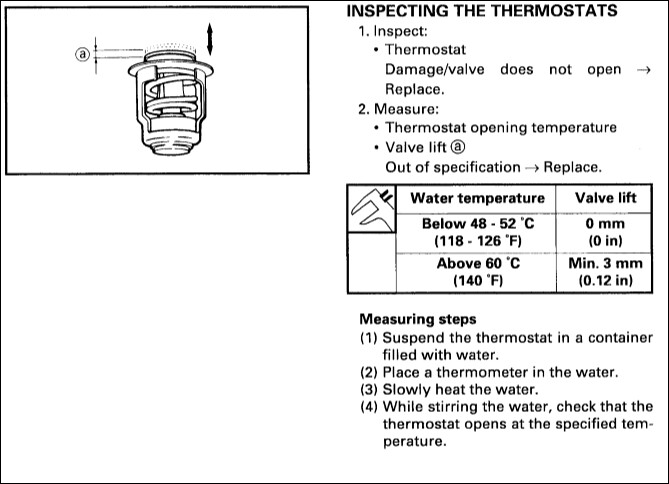
    My next step is to check the T-stats and if they are OK, I see no option but to remove the heads and see the condition of the water passages. Since the temperature gauge sender is on the starboard side, and it does not show a high temperature , I am going to disassemble the port side first.

    Any advice?
    Last edited by KlinkSanford; 01-16-2017, 03:21 PM.
    1993 Mako 161 Flats, 1994 P115TLRS

  • #2
    Also, can anyone direct me to a link where I can see the water flow diagram for a ProV 115 or 130?
    1993 Mako 161 Flats, 1994 P115TLRS

    Comment


    • #3
      pull the stats and test in a pot of water as you heat it to make sure they open and closed inspec.

      inspect the passages when you have the stats out and check/replace the PRV

      Comment


      • #4
        Is the engine used in salt water and flushed regularly?

        What you describe is a typical blocked coolant passage/block from salt build up. Water cannot get thru the block / head fast enough, then over-heats.

        Seeing inside the thermostat will give you an idea of what, if any salt is built up inside the block...
        Scott
        1997 Angler 204, Center Console powered by a 2006 Yamaha F150TXR

        Comment


        • #5
          I agree w/ the suggestions made below. I'll add one more thing. Are you experiencing the high temp alarm at WOT when the engine is trimmed up? If so, have you tried trimming engine down while maintaining WOT to see if alarm continues?

          I have experienced the high temp alarm when running my fathers flats boat at WOT and trimmed up high (just under the prop ventilating). I then trimmed down while maintaining WOT and this killed the alarm.

          The above is an unusual scenario, but my fathers hull is an unusual design. It's unlikely you're dealing with the same, but I thought to mention it just in case.

          I believe you can swap locations of the senders...temp to port and pressure to starboard? Give this a try and if alarm does not sound then at least you'll know its the starboard head that has the cooling issue.
          Jason
          1998 S115TLRW + 1976 Aquasport 170

          Comment


          • #6
            Thanks for all the advice. The engine came from Tampa, saltwater, though it has no exterior corrosion, does not look like it has been used much during its 22 years. From my experience in saltwater, it likely needs the heads removed and cleaned, I'll do the thermostats first and see how the passages there look.

            The boat is a 93 Mako 161 flats boat, the engine was trimmed down both times it fired the overheat alarm.

            I will get to it next week and report results here.
            1993 Mako 161 Flats, 1994 P115TLRS

            Comment


            • #7
              My old neighbors V6 200 2 stroke, (also on a Mako). Did the exact same thing.

              New WP, etc, no good.

              Pulled the heads, about 95% of the lower block coolant passage was clogged with salt..

              Ran great after we got all that crap out!
              Scott
              1997 Angler 204, Center Console powered by a 2006 Yamaha F150TXR

              Comment


              • #8
                Very common problem, usually bloched up cooling passages, you will need to remove the heads and anything else you can to gain access to the water passages, before you start, do you know how to drill out/remove broken stainless bolts in Aluminium? because you are probably going to need to learn. Lots of people will tell you to flush with vinegar, salt away and many other much easier methods, but most don't work for blocked water jackets!

                Comment


                • #9
                  More than likely you have blocked cooling passages, as others have said. Hopefully you have just stuck thermostats that are not opening fully. Pull and check them, while you're at it, check your pressure control valve (pcv). Most time the pcv causes low rpm overheat, not high rpm. The pcv, spring, and seat (the pcv valve has been reengineered, the round mushroom end goes towards the seat). Once you check them, post some pics.

                  Here's specs and the procedure for your t-stats, make sure you have the minimum 3mm valve lift:

                  [IMG]V150.Tstat by Charles Postis, on Flickr[/IMG]

                  If they do not pass (you may have confirmed high rpm overheat cause), even if they do, better off just replacing them anyway, as well as the pressure control valve.

                  I had the same overheat problem w/my used motor. It was the first time in many years of me running it. I started with the normal easy initial check out (thermostats, pressure control valve, water pump and inlet tube, etc.) I did not find any issues with them . However, did find some minimal deposits within housings. Pulled the heads and exhaust cover. Head bolts were no problem for me. But the smaller bolts for the exhaust and head covers were a donkey's rear end. Although most think they are stainless steel, they are NOT. Broke 6 in total. Was able to remove 4 with cobalt drill bit, had to drill oversize and Helicoil the other two. I had some total blockages within some of the passages (not nearly as bad as some of the stories I have heard). I wound up scraping deposits by hand after some softening with various solvents.

                  Maybe you'll be lucky!

                  Good luck!
                  Chuck,
                  1997 Mako 191 w/2001 Yamaha SX150 TXRZ Pushing Her

                  Comment


                  • #10
                    We didn't have one broken bolt with that 200...

                    And it was occasionally flushed by my neighbor, unk by the PO. The exterior (under the hood) looked pretty salty as well... Just got lucky..
                    Scott
                    1997 Angler 204, Center Console powered by a 2006 Yamaha F150TXR

                    Comment


                    • #11
                      Just for future reference ; HOW do you drill out broken stainless bolts in an aluminum casting ?
                      '87 Outrage 18, '04 F150
                      '97 SeaArk 15, F25

                      Comment


                      • #12
                        I don't know the answer to that ^^^, but lots of penetrating oil, a heat gun, some tapping on the head of ANY combative / stuck bolt should help loosen it up.

                        Those head bolts are not small.
                        Scott
                        1997 Angler 204, Center Console powered by a 2006 Yamaha F150TXR

                        Comment


                        • #13
                          Originally posted by tarheel53 View Post
                          Just for future reference ; HOW do you drill out broken stainless bolts in an aluminum casting ?
                          very carefully

                          Comment


                          • #14
                            You need to start with good quality drill bits, make 100% sure you start on centre, and drill straight and slow, some use left hand drill bits.

                            Comment


                            • #15
                              Originally posted by ausnoelm View Post
                              You need to start with good quality drill bits, make 100% sure you start on centre, and drill straight and slow, some use left hand drill bits.
                              Sure are a few bolts on these Yamahas!
                              [IMG]KIMG0128 by Charles Postis, on Flickr[/IMG]

                              The smaller 6mm cover bolts are more likely to break rather than the 8mm head bolts.

                              Like I said before, none of these bolts are stainless steel. Some member in this forum said what they were made of, I can't recall. I do know they are made of some type of ferrous metal and are attracted to magnets. They are hardened but still require a quality drill bit, best to use cobalt drill bits. There are two grades, M35 and M42, 5% and 8% cobalt respectively. M42 8% being better quality. I never used left hand drill bits, maybe they will automatically extract some broken bolts from the heat of friction and thread orientation as well?

                              IRWIN Tools 5 Piece Left Hand Cobalt 5/64-Inch to 19/64-Inch Cobalt Twist Dri... | eBay

                              My experience:
                              I broke six 6mm bolts and no 8 mm bolts when tearing down my motor. First I center punched the broken bolt as carefully as possible to ensure centered depression for drilling. I used a cobalt bits sized progressively to remove as much of the broken bolts as possible. The cobalt bit removed the bolt material in spiral coil as long as I kept the rpm of the drill at, I would estimate, about between 300-400 (you get a feel for it). I then used a tap that extruded the remaining bolt in pieces. I chased with a tap, blew out, cleaned with mineral spirits and blew dry. Two of the broken bolts I damaged the threads and had to drill oversize and insert Heli-coils of the same 6mm thread size.

                              It was not that difficult, and if I did take a little bit more precaution, maybe I would not of had to install Heli-coils in the threads I damaged.
                              Chuck,
                              1997 Mako 191 w/2001 Yamaha SX150 TXRZ Pushing Her

                              Comment

                              Working...
                              X