Buy Yamaha Outboard Parts

Announcement

Collapse
No announcement yet.

How To separate stuck lower unit

Collapse
X
 
  • Filter
  • Time
  • Show
Clear All
new posts

  • How To separate stuck lower unit

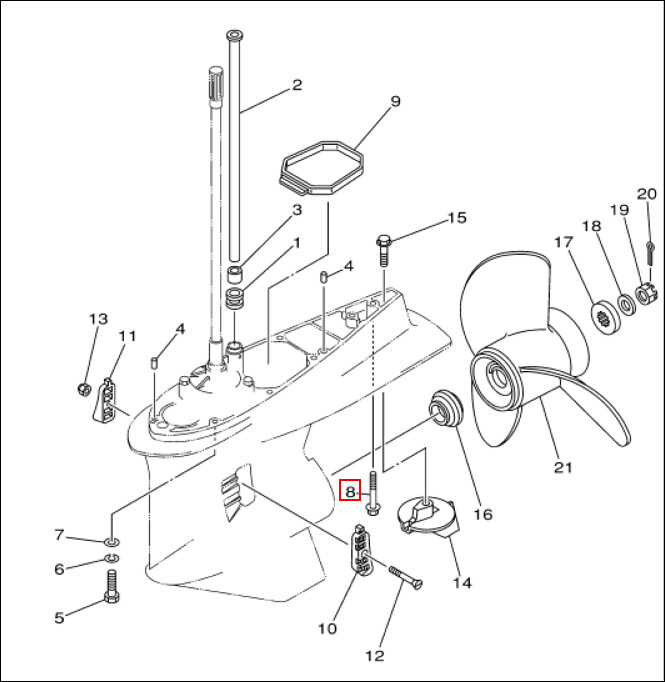
    Tried to separate the lower unit at winterization time to bring the lower unit home with me to replace impeller (boat is in Maine, me in PA) and it wouldn't budge. I only had a very short amount of time for this and ended up putting the bolts back in and will tackle it in the Spring.

    I'm assuming that the drive shaft might be seized into the power head. This is on me, though. I did not realize that the lower unit should be removed once a year to re-grease the shaft splines and I've had the engine for 3 seasons, now. In (somewhat) my defense, I'm very familiar with Merc sterndrives and have never had an issue with removing a lower unit, even after many years of service. But still, my fault for not knowing.

    I'm thinking of using plastic wedges, such as a tree felling wedge. Maybe some other, smaller ones - I'll see what I can dig up or find over the winter. Is there anything you guys have found that work for you? Any tricks you have found, over the years? It's relatively straight forward and I'm not anticipating any "magic cure all" ideas - but just in case there's some other methods, I'm all ears!
    2000 Yamaha OX66 250HP SX250TXRY 61AX103847T
    1982 Grady Weekender/Offshore (removed stern drive & modded to be an OB)

  • #2
    ugh...

    Are you sure you have all the bolts out?

    do you see any gap at all between the LU and the upper casing?

    if so, you could start with a wood chisel, and move up from there


    Seems I've read Rodbolt mention using a Sawzall to cut through driveshafts -

    I'm not picturing where you could do that without also destroying an expensive casting...

    thank gawd I've never had to deal with it -

    but i have heard of prying /wedging between the "anti-ventilation plate" and the similar projection above it

    of course, simultaneously bend/break BOTH and you are looking at some real money....

    Comment


    • #3
      Here ya go Dennis, read this thread, RB posts about the wedges, etc:

      http://www.yamahaoutboardparts.com/f...t-th26105.html

      And:

      http://www.yamahaoutboardparts.com/f...l-th23030.html


      If there's a bolt under the trim tab, (accessible from the top) is that removed?


      .
      Last edited by TownsendsFJR1300; 12-15-2016, 08:28 PM.
      Scott
      1997 Angler 204, Center Console powered by a 2006 Yamaha F150TXR

      Comment


      • #4
        fairdeal's point is a good one - verify that all bolts are out (including one that is typically below the anti-ventilation plate. If all good....

        I inherited a Mercury "Classic Fifty" - late 80s vintage. I don't think it had ever been apart. It took me nearly 3 weeks to get the lower unit off. I used lots of PB Blaster, wedges and chisels. I even had it off the boat and stored it upside down so that PB blaster could flow down the driveshaft and into the bottom of the engine. Every day I'd go out and hammer on the wedges and chisels to ensure they were tight and applying pressure. The wedges were steel - plastic wouldn't do it. At the end, I even hit the chisel end at 90 degrees to normal - which levered the chisel in the gap. It finally gave way. I did crack the back of the casting of the ventilation plate - but it still holds in place with the single hidden bolt under the antiventilation plate.

        You can cut a hole in the mid-section to insert a sawzall. I drilled a couple of holes only to insert the tub of the PB Blaster.

        I no longer have that engine, but it's clear that Mercury used different metals in the block and the driveshaft - ensuring corrosive action. Make sure you take that lower unit off every year once you get it off.

        Comment


        • #5
          Originally posted by fairdeal View Post
          ugh...

          Are you sure you have all the bolts out?

          do you see any gap at all between the LU and the upper casing?

          if so, you could start with a wood chisel, and move up from there


          Seems I've read Rodbolt mention using a Sawzall to cut through driveshafts -

          I'm not picturing where you could do that without also destroying an expensive casting...

          thank gawd I've never had to deal with it -

          but i have heard of prying /wedging between the "anti-ventilation plate" and the similar projection above it

          of course, simultaneously bend/break BOTH and you are looking at some real money....
          Bolts? If you haven't done it for a while, you may have missed a couple in the diagram. Remember to remove the rubber plug to gain access to the anti cavitation plate bolt # 15, remove it then you have access to # 8. 9 bolts total.

          [IMG]LU SX@%) by Charles Postis, on Flickr[/IMG]
          Chuck,
          1997 Mako 191 w/2001 Yamaha SX150 TXRZ Pushing Her

          Comment


          • #6
            Yes, I am positive all bolts were out - but I can appreciate why you guys are suggesting that. Heck, if I was responding, I'd suggest the same thing... start with the easy (and sometimes overlooked) things.

            I really only had about 20 - 30 minutes to get it off. It was sort of last minute thought to take it home with me for the winter rather than do it in the spring.

            I'm leery to use a metal chisel on the aluminum, but I suppose something like the wood chisel, with it's shallow angle, could at least work to start to get the casing separated. Then I can use something a little safer.

            Scott, in the second link there is mention of a "bushing above the impeller" that gets stuck. I'm confused on what that is? I realize that it's in regards to a F150, but isn't this area pretty much the same as an OX66? Meaning, I don't understand what "bushing" can be holding the lower unit back from separating?
            2000 Yamaha OX66 250HP SX250TXRY 61AX103847T
            1982 Grady Weekender/Offshore (removed stern drive & modded to be an OB)

            Comment


            • #7
              Something I have seen done a few times (though I doubt I would do it to my own motor) was the ensure all bolts are out, shift shaft disconnected (if necessary) and wedges jammed in all around the lower unit to keep the tension even, place motor in down position, put something soft under skeg and start the motor....the vibration, combined with the wedges will sometimes, simply shake it off!

              Comment


              • #8
                Originally posted by ausnoelm View Post
                Something I have seen done a few times (though I doubt I would do it to my own motor) was the ensure all bolts are out, shift shaft disconnected (if necessary) and wedges jammed in all around the lower unit to keep the tension even, place motor in down position, put something soft under skeg and start the motor....the vibration, combined with the wedges will sometimes, simply shake it off!
                Plus 100^^^. I would put water to both muffs and the powerhead flush (and remove the prop) just in case.

                Re the mid section bushing. For the F150, it's pretty light duty and is NOT solid. Kinda looks like an impeller but with a metal ID collar and OD collar. (if that makes sense-it's NOT solid but with veins-I suspect to allow some movement for the drive shaft).

                That bushing is smooth and there is a slight gap between it and the shaft. Being smooth and the gap, that's not holding your LU in place. **If you can spin the engine over(even by hand), it's NOT FROZEN, nor your issue.

                As posted previously, the splines to engine crankshaft, with salt water access, lack of grease/ removal once in awhile is what's hanging up if all the bolts are out..

                I never tried it but in addition to running the engine with the bolts removed (to hopefully break the rust loose-sneak in plastic/wood wedges if possible), shifting forward may help break that rust loose.

                *My thinking is the additional shock of spinning the prop shaft may help.


                Again, remove the prop and have something right under the LU so it doesn't drop more than maybe 2-3".
                Last edited by TownsendsFJR1300; 12-16-2016, 08:44 AM.
                Scott
                1997 Angler 204, Center Console powered by a 2006 Yamaha F150TXR

                Comment


                • #9
                  I never would have thought of cranking the engine over for the "shock" treatment, so to say. I'll definitely give that a shot before pounding on anything. Thanks for the clarification on that mid-section bushing, too!

                  Thanks, guys!
                  2000 Yamaha OX66 250HP SX250TXRY 61AX103847T
                  1982 Grady Weekender/Offshore (removed stern drive & modded to be an OB)

                  Comment


                  • #10
                    leaving a few bolts partially screwed in to catch the lower would be better than letting it fall on something soft.
                    Also running the motor on muffs will heat the crankshaft some. never know what will help break things loose
                    Last edited by 99yam40; 12-16-2016, 10:07 AM.

                    Comment


                    • #11
                      Heat... good idea, too!

                      I'm going to look around for a brass, pipe-cleaning-type wire brush. Something where I can add a long handle and use it to wire-brush where the driveshaft inserts into the power head to make sure I get it clean.

                      So here's a random thought (maybe thinking too much?)... If one is adamant about greasing the driveshaft threads (and even though you make sure to avoid the top area), over time, wouldn't there be a buildup of grease that collects ABOVE the top of the driveshaft in the area that we don't want it to? Meaning, you can be careful about not greasing the top of the shaft, but when the shaft is pulled out, some grease will obviously remain in the "socket". When the shaft is reinserted, it would push that grease up. Repeat every year and there would be a collection of grease starting to appear in the top of the socket. Should that area be occasionally sprayed out with a degreaser like Brakleen?
                      2000 Yamaha OX66 250HP SX250TXRY 61AX103847T
                      1982 Grady Weekender/Offshore (removed stern drive & modded to be an OB)

                      Comment


                      • #12
                        if worried about that ,I think a wooden dowel run up it or a pipe brush with long handle like you say would grab some grease or at least indicate too much is up there

                        Comment


                        • #13
                          I tried the 'shock treatment' where you run the outboard with wedges in place. At first it was so tight that the engine wouldn't crank (i.e. to hard for the starter to rotate the engine). I loosened it a bit - and tried again. Didn't work for me - but I have heard that it has worked for others.

                          As for the grease, never apply any to the top of the shaft and just a film on the sides. Otherwise you'll have air locked in the top and always pushing down on the shaft. Here's a case of too much lube can be bad.

                          Comment


                          • #14
                            are you sure you removed all the bolts?
                            the 2.6L has 7 the 3.1L has 8.

                            Comment


                            • #15
                              I had not thought about the pressure the wedges put on the crankshaft and bearings .
                              I am sure that thrust movement of shaft is not good on things when running or just turning

                              what do you think about running with a bind on it Rodbolt?

                              Comment

                              Working...
                              X