Buy Yamaha Outboard Parts

Announcement

Collapse
No announcement yet.

Open Circuit - Potential fire in the port engine

Collapse
X
 
  • Filter
  • Time
  • Show
Clear All
new posts

  • #16
    Originally posted by vb2oc0371 View Post
    Issue resolved.
    1. Thoroughly wire brushed and scraped all contact points inline with the current path. The battery contacts were definitely in need of cleaning even though it was done less than 6 months ago.
    2. Applied dielectric grease to contact points to improve conductivity.
    3. Replaced all wing nuts with nylock nuts on the battery terminals. The wing nuts were not staying tight, which compromised conductivity.

    So one last comment/question:
    Apparently the burnt wire isn't ground wire, but a bonding wire which connects the power head to the lower unit. It's not a current carrying wire. Usually when there's a high resistance in the negative due to it not being connected or loose corroded contacts, current flows via an alternate path using this bonding wire.

    Since the bonding wire wasn't melted to the point of separation, I'm curious if can apply a coat of marine grade electrical tape to it instead of replacing it. The Yamaha mechanic said it's not an easy job to change it out, and honestly I haven't gotten up under the engine to judge the level of effort (boat is on lift so it's chore to get up in there).


    Thanks.
    OK, I'm going through in what I think to get some answers. First off, what is the purpose of this wire? I believe it is to bond the metal components as to prevent electrolysis, and thus prevent corrosion between metals. This is especially where there are non-conductive components between other metal components (IE: rubber engine mounts).
    If this is correct, I would want the best connection I can have.

    Others, please ring in and give opinions/facts.

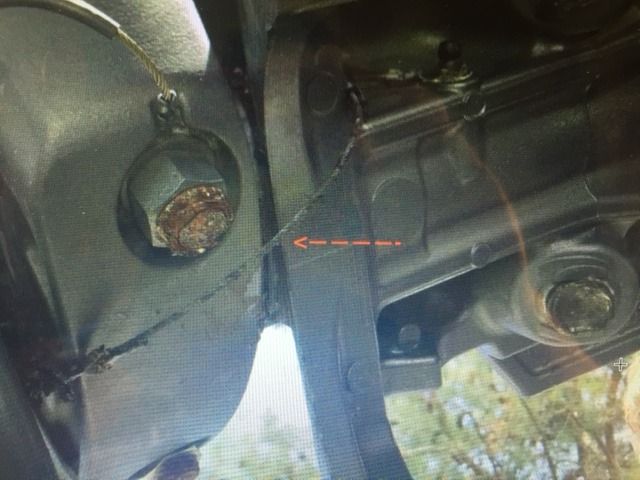
    Now, I looked a little further into what might be involved. From the top connection, it looks like it is just connected via the grease fitting. The middle connection is at the lower engine mount bolt/nut. The lowest connection is at the bottom of your upper casing.

    To replace the wire, it looks like you have to remove the grease fitting for the top connection, remove lower mount starboard cover, remove the nut from the starboard lower engine mount (now this may be very difficult because of corrosion that may be present on the bolt head). The lower unit has to be removed to access the bolt that connects the lowest connection (this, I'm not sure of).

    Of course, if the wire/and connections are in good conductive condition, you may not have to change the wire. You may be able to splice (Silver soldered, quality crimp, or otherwise) a new section of same make up wire to replace a bad section . The only reason I think the wire is sleeved in plastic is to prevent the wire from damaging your paint finish.

    If not doing this now, I would definitely do so next time you remove lower unit for service (water pump or otherwise).

    Not sure "nylock nuts" are good on battery terminals, may wish to double nut instead.

    What about the fuse connection to the negative battery terminal (unusual, to say the least)? Did you ever figure out what it feeds?

    2006 and Later F150XA_011 Yamaha Outboard BRACKET 1 Diagram and Parts
    Chuck,
    1997 Mako 191 w/2001 Yamaha SX150 TXRZ Pushing Her

    Comment


    • #17
      For the battery terminals, I use SS wing nuts with 5/6" SS, locking washers(split) and then tighten just beyond snug with a pliers...

      Never had one come loose...

      Also dielectric grease on the posts/cable..
      Scott
      1997 Angler 204, Center Console powered by a 2006 Yamaha F150TXR

      Comment


      • #18
        you also have way to many lugs on the - terminal.
        would be better to move them to a dedicated ground buss.

        Comment


        • #19
          Throw the wingnuts in the trash. If you have to use pliers why not use nuts?

          Comment

          Working...
          X