
 Tweet
Tweet
Hi all, I have a 50HP 2 stroke that is rocking forward and back. The guy at the shop says it might be a engine mount, he told me this after he serviced it charged me and they said he can't get the parts and no to use it, so i am looking at doing it myself, is it what he said is broken ? could someone point me to a part number please. I have uploaded video here. https://youtube.com/shorts/3smcx-_H3_E
-
At the top of the page is a link to Yamaha parts. What you're looking for is likely in the "bracket" subsection. Maybe it can be re-welded (I think that piece is welded, anyways) -- you'll know more once you get it out. I wouldn't buy anything till you get things apart... sometimes things don't come apart on old engines... and/or other things break during the process.
I wouldn't hold anything against the repair shop - they did what you hired them to do, right? Are they just not able to get these parts - or are they more of a basic shop and don't really get into more indepth repairs?2000 Yamaha OX66 250HP SX250TXRY 61AX103847T
1982 Grady Weekender/Offshore (removed stern drive & modded to be an OB) -
seems I read a thread about this type of problem on a 40 or 50 Yamaha some time back.
he even had a link to a U tube video that showed what all needed to be done to fix it.
you might do some searching on line and on U tube.
may have been rusted off bolts thru the upper mount
may have been the pivit tube that rusted off.
anyway he had to remove the top and bottom mountsLast edited by 99yam40; 12-03-2023, 01:33 AM.Comment
-
Certainly the problem is "with" the upper engine mounts;
although whether it is both mount "dampers"
or bolts
can only be determined by getting a close look -
so first step is to lift off the powerhead.
(actually first step is to drop the LU -
that makes getting the powerhead off & on easier)
Until you see exactly which parts are needed
(and for that you'll also need full model number of the engine)
no one can say what is or is not "available"
And I'm optimistic you can get what you need - even if only used parts from eBayComment
-
Need to know model and year of engine please.Comment
-
Thanks for your reply crew, I have found a video online showing how to remove the powerhead, so I'm planning of doing the work myself. the engine number is 1000277 looking like a 2003 year and Yamaha 50HETOL - One question, if I drop the LU, do I need to drain the oil first ? also I know I will need to replace the powerhead gasket, when putting back together, what other parts will I need to replace when putting back together, of course if everything comes aport as planned and not including the broken mount.Comment
-
There is no need to mess with the LU lube;
its a sealed unit that simply separates from the rest of the outboard assembly.
Yes, you will need the "UPPER CASING GASKET" which seals the bottom of the engine block to the "upper casing".
What additional parts will depend on what you find, and what occurs in dis-assembly.
It may be that you have sheared the three bolts (15) that fasten the rubber motor mount "damper" (16)
- that would give you the challenge of extracting those broken stumps...
Or it may simply be that the damper has disintegrated...
I don't know, specifically, for your engine model -
but on some models,
removing the upper mounting bolts (19)
requires "sliding back" the entire assembly
and that means undoing the lower mounting
bolts (14) nuts (5) and dampers (11)
and those could turn out to be corroded /need replacments
In any case, from a quick look, any part you may need appears to be available...

Comment
-
Thank you fairdeal, I'm going to give this a go and try to fix it myself, will give you an update on how things go.Comment
-
Update, I have lifted the powerhead off, and this is what I see, looking like number 16 is done,
Comment
-
are the heads of the long bolts#19 still thru #17?
hard to tell in the pictureComment
-
Yes, they are. the 19 bolts and 6 nuts are all there. Not broken. Not sure how to get them out !
Comment
-
I think you must detach the entire midsection assembly from the bracket assembly:Originally posted by leeski36 View Post
remove the two #5 nuts and the two # 6 nuts
pile up some blocks to support the midsection, keep it parallel to the ground
and then "slide it backwards" away from the transom -
in so doing,
pulling the two #19 bolts and the two #14 bolts
out of where they pass through the steering bracket
there is likely to be some "prying" involved,
maybe some "hammering"
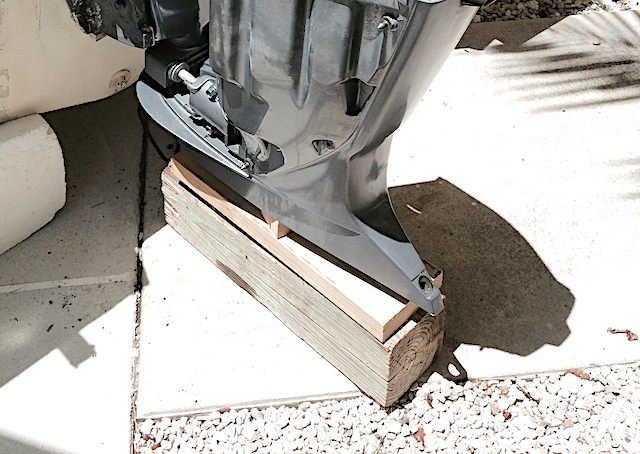
here is a midsection in the process of being "slid back" -
you can see the bottom bolts exposed
as they are being withdrawn from the steering bracket
Comment
-
I've never done this particular project, but it seems like it might be easier to pull the engine off the boat, first? If you're in a garage, you can use the ceiling... if you're outside, a very simple gantry crane can be made out of wood - in essence, a basic swingset design. You may not even have to remove any cables/etc... maybe just the steering. But even so, those are all a pretty quick job and it would give a lot more "user friendliness" to this job 2000 Yamaha OX66 250HP SX250TXRY 61AX103847T
1982 Grady Weekender/Offshore (removed stern drive & modded to be an OB)Comment
-
"I think you must detach the entire midsection assembly from the bracket assembly:
remove the two #5 nuts and the two # 6 nuts"
I have setup my engine like this, and removed nuts 5, but can't get a spanner in and on to nut 6 ? any ideas, do you know what size that nut would be ? 13 is a bit lose.
Comment
-
Sorry, didn't have my coffee this morning, just worked out if I turn the engine I can get to the nuts, hahahaComment
Comment