
 Tweet
Tweet
I have an F225TXR built in 2006 with a leaking trim cylinder. I have read a lot of posts on this site to try to help before posting this thread. So far I have had no luck removing the trim cylinder end screw with my spanner wrench. I have used heat and a 3/8" breaker bar attached to the spanner wrench without success. Mention has been made of the importance of using the right spanner wrench. Does anyone know a part number or source for the 'best tool for the job' before I do any damage? Does anyone have a suggestion on a better technique to free the end screw so I can replace the seals and O rings? Thanks for your help.
-
-
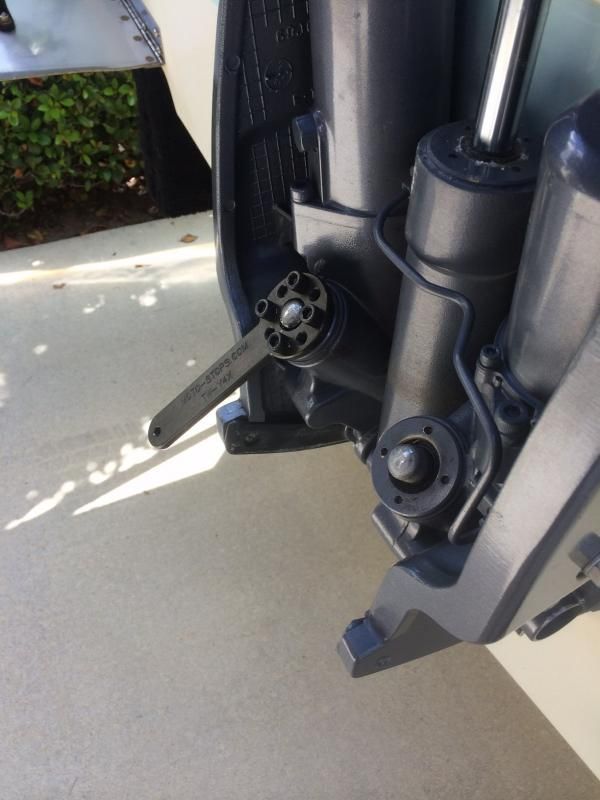
I would use a four pin tool like this.
Heat the cylinder and apply some dry ice to the cap before attempting to untighten it. Use a piece of PVC pipe between the top of the tool and the mid-section to hold the tool in place. Put a section of pipe on the handle of the tool and start pulling. Hold the pull for a period of time. The cap should soon break free.
http://moto-stops.com/products/four-...rim-wrench.php
-
Thanks for the quick reply boscoe99. Four pin tool and replacement parts on order. Will have a few days to find some dry ice and then will have a go at it.Comment
-
Publix supermarkets carry dry ice....take your cooler to the store to pick it up...wear gloves to handle it as it will " burn" your skin!....Comment
-
Using the tool Boscoe recommends is ideal, but if you cant get the tool , I have had good luck using heat + punch+hammer. If you are careful you wont bugger up the hole too much. Apply liberal heat .Once cracked with the punch use the spanner to finish removal.Comment
-
I don't know why they simply don't cast these with hex heads so that a tool has more surface to grab! Hate little pinhole fasteners, get ugly very quicky after one application.Originally posted by Nautical View PostComment
-
hammer and punch are always going to mess up the holes so that the correct tools do not work very well any more.
Seems threading the holes and running bolts/screws into them instead of pins would help keep the tool in place instead of having to slip a piece of pipe over it to hold in from popping out.
But then there may not be enough meat in the parts and corrosion in the threads would be a problem I guessComment
-
Interesting comment about threading the holes. Never thought about that. The holes in the tool are threaded for the pins. Would be nice if the cap was threaded so that with the use of longer pins the pins would thread through the tool and into the cap, securely holding it in place. I like it.Originally posted by 99yam40 View Post
Now how to keep the threaded holes free and clear of crap is another matter however.Comment
-
Maybe fill them with greaseOriginally posted by boscoe99 View Post
or grease & little rubber plugs
But you know when ever you needed to screw something into there you would not be able to, because no one will keep them clean and greased.
maybe just tap threads into them when you need to get it apart and you cannot with just pinsComment
-
Aluminum is soft and the threads will corrode and you wont be able to screw in the pins. Tough to clean small threads.Not sure but I think original factory install uses a thread locking compound as well and you have the o ring pressure. Therefore you are fighting two opposing forces.Maybe they should look at a teflon seal instead of crushing an o ring and stop using that damn thread locking stuff.Perhaps they need the o ring due to the tremendous hydraulic pressure exerted on the cap seal however.Last edited by Nautical; 10-30-2015, 09:31 AM.Comment
-
Wonder why Yamaha didn't just put a square or hex head on top of the cap to facilitate removal with a wrench or spanner?.....too simple, I guess?....Comment
-
Cost would be my guess for the cap being round and without flats. A lathe really likes to cut round stuff. Flat stuff takes more time and money. Might not be much per cap but when tens of thousands of caps are involved it all adds up.Comment
-
At least in F150 shop manual, no thread locker or anti sieze is used on the threads. O-rings have very little resistance when R&Ring them.. Between the fairly high torque on the caps and natural corrosion (especially with salt water and aluminum) can make breaking the caps loose sometimes a bear..
I strongly suspect those 4 holes (vs cap) are used to keep Non-professionals (or folks without the correct Yamaha tools) from getting into them.
The wrench Boscoe posted DOES have replaceable pins should one get damaged.Last edited by TownsendsFJR1300; 10-30-2015, 05:28 PM.Scott
1997 Angler 204, Center Console powered by a 2006 Yamaha F150TXRComment
-
I am now wondering why such high torque values for the caps? The O ring is doing all of the sealing. And why does the tilt piston cap have more torque than does the trim piston cap for the F150 whereas for other models the tilt piston cap has more torque than does the trim piston?Comment
-
Cause a Yamaha isn't a Yamaha...Originally posted by boscoe99 View Post
My fork tube (yes, MC again) aluminum caps, o-ring, steel tubes (pressurized) are spec torqued to 17 Ft lbs..
My oil drain plug on my Yamaha MC is spec'ed to be torqued to 30 ft lbs.
The exact same bolt, (in actually a stouter block) on my F150 is spec'ed to be torqued to 20 ft lbs.. WTH????
I could go on...
 Scott
Scott
1997 Angler 204, Center Console powered by a 2006 Yamaha F150TXRComment


Comment